Monday, March 31, 2014

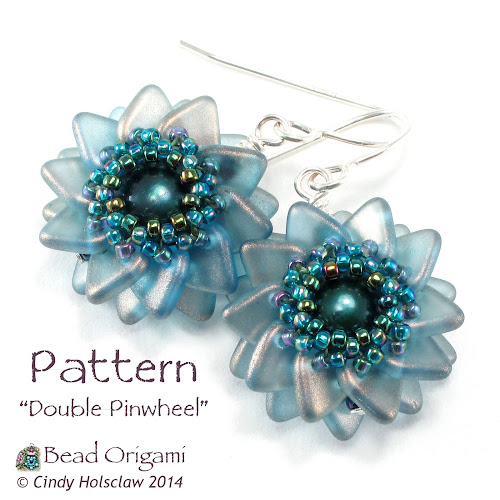
New Pattern: Double Pinwheel Beaded Beads

My latest beading pattern, the Double Pinwheel Beaded Beads, is now complete!

Working with Two-Hole Triangle Beads


This is my first pattern that uses these new CzechMates two-hole triangle beads, but it's my second attempt at using them in a beading design. For my first attempt, I made a pair of earrings based on my Water Lily Windows pattern, using little flowers with triangle beads instead of the rizo beads.


I was quickly surprised at how much attention you have to give to the triangle beads - unlike SuperDuos and Tilas, two-hole triangles have a left hole and a right hole, and which hole you pass through really matters! It was a little too complicated to explain these earrings as a variation on the Water Lily Windows pattern, but I liked the effect of the triangle beads in this arrangement, so I explored this further in a second pair of earrings; I used another layer of triangle beads, with more repeats around a pearl center, and a more simplified arrangement without the Tila windows.

Pinwheel Beaded Earrings


This beading pattern makes a delightful pinwheel-shaped beaded bead, with tons of movement and texture! While you're making this beaded bead, you still need to pay attention to which of the two holes of the triangle beads that you pass through in each step, but other than that it's much more straightforward than some of my more complicated designs. It's a great project for an advanced beginner beader, and an excellent introduction to working with two-hole triangle beads. Two of these beaded beads make for a quick pair of earrings!

A Pinwheel Pendant


But this idea isn't just for earrings; a larger central bead, paired with more triangle beads, makes a dainty solo pendant.


And smaller central beads with fewer triangle beads make for a cute pair of matching earrings!


Five Different Beaded Beads!


By adjusting the size of the central bead, and the number of triangle beads, you can make at least five different sizes of this beaded bead. I describe how to make each of these five sizes in the pattern, and I incorporated all of them into this lovely necklace:


The round beads in this necklace were a Christmas gift from my sister, who found them in a bead store in Japan. I used a few O beads as spacer beads too!


The Double Pinwheel Beaded Bead pattern is available at www.beadorigami.com if you'd like to make your own!

Thanks for visiting my blog! Please subscribe to my mailing list for updates on the latest and greatest Bead Origami news!

Wednesday, March 19, 2014

Saving Leftover Beads, or Bead Cores

I've embarked on a bit of a bead science experiment, and I already have some preliminary results!


Neat vs Not Neat Beading


As you may or may not know, I'm a rather neat beader. When I'm working, I tend to keep all my bead shapes and colors in neat little piles on my bead mat. A typical example of my bead mat can be seen in the left portion of the photo below, which is what it looked like when I was weaving the third colorway of the Water Lily Windows bracelet. (For contrast, at the time, a rather famous beader was working from a bead soup on the tray to the right):


I have been known to bead messy on occasion though. The only photographic evidence of this is seen in the photo below. This is from when I wove a beaded version of an Arixtra molecule.


Saving Leftover Beads


Why am I talking about neat vs. not neat beading? Well, as a neat beader, it's relatively easy for me to sort out all of my leftover beads back into their little tubes and baggies. If I didn't naturally bead so neatly, I probably wouldn't take the time to sort them all out. I'd likely still save these beads though, perhaps as a "bead soup" for later reference into my colorway and bead choice habits.

I realized that, just because I'm a neat beader, that shouldn't stop me from saving a gram or two of leftover beads on my tray (unless the beads are too expensive, like crystals). I started doing this a few weeks ago, and I saved them in a narrow tube so that they would settle into thin, discrete layers for each project that I worked on, like an ice core. This way, I could return to this "bead core" later and see what kinds of beads and colors I was using at that time, the same way that scientists analyze ice cores from Antarctica to see what the climate looked like thousands of years ago.


Bead Core


This experiment has already yielded some preliminary results! In my current Bead Core, I can identify the beads that I used for that third colorway of the Water Lily Windows bracelet, two colorways of the Half Tila Technocluster beaded beads, and the beads I used for the basic dodecahedron beaded bead that accompanies the Half Tila Technocluster pattern. The latest beads that I added to the core are from a project that I just finished, and I hope to show pictures of it soon.


After I finish this bead core, I hope to start my next one in a longer tube such as a serological or titration pipette, as if my background in science wasn't clear enough already ;)

What kind of beader are you? Tidy? Messy? Write a comment in the comments section below!

Monday, March 17, 2014

New Pattern and Kits: Half Tila Technocluster Set

I'm pleased to release my latest beading pattern, the Half Tila Technocluster Beaded Bead Set!


A Faceted Dodecahedron Beaded Bead


This beaded bead combines Miyuki Tila beads, Miyuki Half Tila beads, bugle beads, and Japanese seed beads with Swarovski rivoli crystals for a very sparkly, tactile, angular beaded bead. This design is woven using the circular netting stitch and a variation on right angle weave, all in the geometry of the dodecahedron, for a total of 12 pentagon-shaped sides with one crystal in the middle of each side.

The crystals sit close to the middle of the design, and I really like how the Half Tila beads reflect and extend the facets of the crystals outward. The angular shapes of the beads used in the Half Tila Technocluster give it the look of an advanced technological device, hence its name.


A Stunning Solo Pendant


The Half Tila Technocluster is self-supporting with no inner core bead, and can be strung through any pair of the triangular-shaped holes formed by the bugle beads. This beaded bead measures about 33 mm diameter, and stands on its own very well as a pendant. I've strung this one on a Diamond O Beaded Chain that I usually use for an O Stars Pendant (though, I think a Diamond O Chain woven with bugle beads would complement this beaded bead quite nicely too):


Matching Earrings for a Complete Set


A pair of matching earrings completes the Half Tila Technocluster Set. Here's the beaded bead in matte metallic patina, bright green, and lavender hues:


And here's the pair of matching earrings for this colorway:


The earrings are light and comfortable, and well-balanced so that the beaded component does not bend forward. Do you see how the earring takes the shape of one of the 12 pentagons from the beaded bead?

A Trio of Beading Patterns in One!


This is perhaps the most technically-challenging beaded bead I've designed, so I was initially wary of writing it up as a beading pattern. If you've previously mastered the Tila Garden Pendant, you're in great shape for tackling this beaded bead. 

If you're new to dodecahedron beaded beads, I really tried to bring my "A Game" when I wrote the pattern for this design. So, I started with the instructions for the matching earrings, which teach you how to use the Tila and Half Tila beads in layered, dimensional beadwork. Then, I include instructions for a basic dodecahedron beaded bead, woven with bugle beads and size 11° seed beads, for an easier introduction to the geometry of this design. Finally, I conclude with the instructions for the full Half Tila Technocluster beaded bead, which combines both lessons together for this stunning statement beaded bead. This is one of my longer patterns, and clocks in at 28 pages and 90 full-color photos and illustrations.  


Four Kits!


Beading kits for this design are available in the four colorways shown above, and include all the beads and findings needed to make the main Half Tila Technocluster beaded bead, the matching earrings, and at least one basic dodecahedron beaded bead.

Thanks for looking!

Tuesday, March 4, 2014

New Pattern and Kits: Water Lily Windows Bracelet and Earrings Set

My latest beading pattern is done! Presenting the Water Lily Windows Bracelet and Earrings Set:

Floating Beaded Water Lilies


This pattern describes how to make three different shapes of Water Lily Windows components, featuring little beaded flowers woven from Rizo beads, floating in a frame of Tila, SuperDuo, and Japanese seed beads. In the pattern, I describe how to connect them together for a twisting bracelet, complete with a matching custom beaded clasp. The pattern also covers how to make two of these components into matching earrings, and how to attach pear-shaped Swarovski crystals, with an unusual method designed to make the crystals face forward.


Tila Bead Frames + Flowers


This pattern is part of a series where I've experimented with surrounding other beads with frames of Tila beads. I used a similar strategy to make the oval-shaped components in the Cosmic Windows Bracelet:


The components in the Water Lily Windows Bracelet are more angular, resulting in square, pentagon, and hexagon-shaped framed flowers. To create this bracelet, I could have connected several square or hexagon-shaped components together in a straight line, or I could have arranged a tiling pattern of pentagon-shaped components. Indeed, several different arrangements are possible!


In the end, I settled on a combination of pentagon- and hexagon-shaped components in a nonlinear arrangement, which resulted in a more unusual, but organic look to the finished bracelet. I also experimented with using two different colors of Rizo beads for the flowers, which you can see in the bracelet below:


Three Kits!


Kits for this design are available in the three colorways shown above, and include all the beads and findings needed to make the bracelet and the matching earrings. It's the perfect design for celebrating the coming springtime!

Thanks for looking!
Related Posts Plugin for WordPress, Blogger...